

Pain is a signal, not an enemy
The push-up is considered the safest strength exercise there is: no weight that can fall on you, no bar that can pin you down. And yet wrist, shoulder, or elbow discomfort is one of the most common reasons trainees give up on the exercise. The reason is simple: the exercise is harmless, but it's also an exercise in which 50 to 75 percent of your bodyweight lands on two small joints — a hundred times per session, thousands of times per month.
The good news: almost every push-up pain has a mechanical cause, and mechanical causes can be fixed. This article goes joint by joint — anatomy, typical triggers, concrete corrections — and ends with a pain traffic-light and a short prehab routine. One note up front: this doesn't replace a medical diagnosis. For numbness, tingling, swelling, nighttime pain, or discomfort that lasts longer than two weeks, the joint belongs in the hands of a professional.
The wrist: the most common troublemaker
What's happening there
The wrist consists of eight small carpal bones that sit between the forearm and the hand. With your flat hand on the floor, the joint is extended roughly 90 degrees — the end range of its motion. In this position, load is no longer cushioned by muscle, but transmitted directly through bone, ligament, and joint capsule. For an 80-kg person, that means around 26 to 30 kilograms landing on each wrist — in its least favorable position.
Typical pain locations: the back of the hand (compression of the carpal bones), the base of the thumb (overload of the thumb's saddle joint), and the pinky side (the ligament complex between the ulna and the carpal bones). Pain when pressing down on the wrist points to compression; pain when lifting off points to overstretching of the flexor side.
The most common causes
- Limited mobility. Anyone who types all day often has less than 90 degrees of extension. The push-up then forces the joint into a range it simply doesn't have.
- Volume ramped up too fast. Ligaments and the capsule adapt more slowly than muscle. Going from 30 to 100 reps a day in two weeks is manageable for the muscle, not for the wrist.
- Hand position. Fingers closed, hands turned inward, weight on the base of the palm: all of it increases compression at specific points.
- Weak forearm muscles. The finger flexors and wrist stabilizers cushion the load — when they're strong enough.
What helps
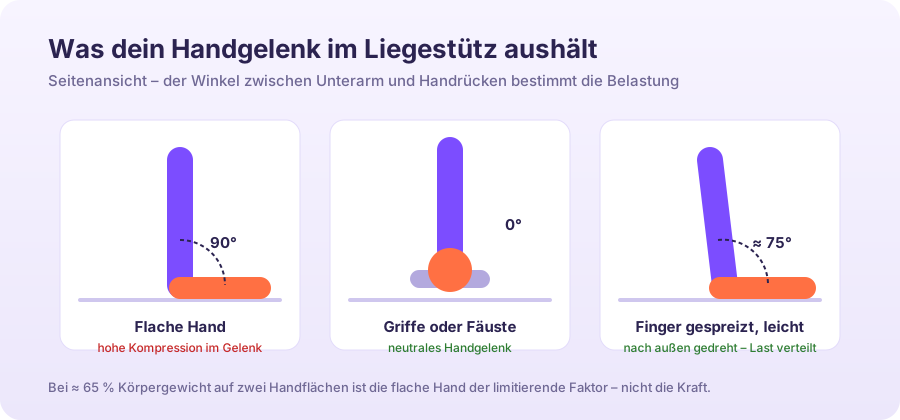
- Get the wrist out of its end range. Push-up handles, parallettes, dumbbells, or fists (see fist push-ups) bring the joint into a neutral position. This is the single most effective fix — and for many people, the reason they can train pain-free at all.
- Turn your hands slightly outward and spread your fingers. A 10 to 20 degree outward rotation measurably reduces extension, and spread fingers enlarge the contact area. Actively press into the floor with your fingertips instead of "hanging" on the base of your palm.
- Build mobility. Two minutes before every session: wrist circles, palms on the floor with gentle weight shifting forward and back, backs of the hands on the floor. After four weeks, most people have their missing extension back.
- Strengthen the forearms. Wrist curls with a water bottle, fingertip holds in a plank, rice-bucket drills with your hands. Strong forearms take load off the passive tissue.
- Dose your volume. More than 10 percent growth per week is rarely tolerable for joints — even if the muscle could already handle more.
The shoulder: where technique decides everything
What's happening there
The shoulder joint is the most mobile joint in the body — and therefore the least stable. The head of the upper arm sits in a socket barely bigger than a golf tee; it's held in place by the four muscles of the rotator cuff and the guidance of the shoulder blade. Between the head of the upper arm and the roof of the shoulder, the supraspinatus tendon runs through a space only a few millimeters wide. If that space narrows — because of arm position or a poorly controlled shoulder blade — the tendon gets pinched. This is called impingement, and it's the classic push-up shoulder problem: a stabbing pain at the front-side of the shoulder, usually in the bottom position or while pressing up.
The most common causes
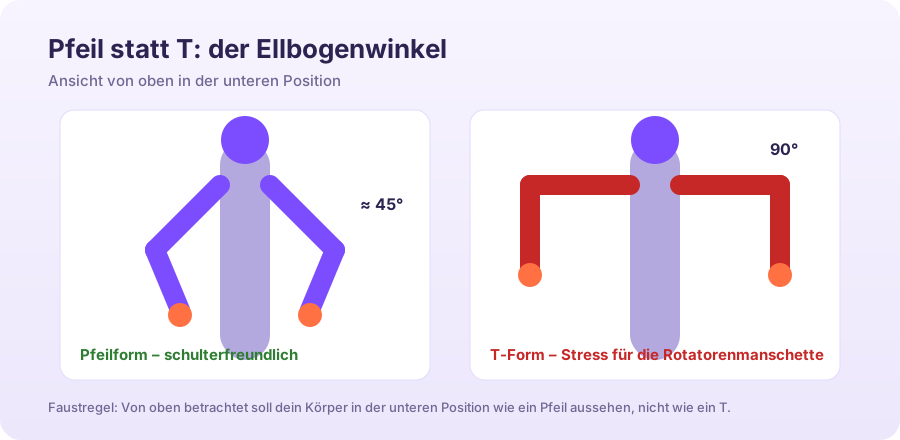
- The T-shape. Elbows flared out at a 90-degree angle put the upper arm into abduction with internal rotation — exactly the position where the space under the roof of the shoulder is narrowest. At around 45 degrees (an arrow shape), it stays open. This mistake alone accounts for a large share of all shoulder complaints during pressing.
- Poorly controlled shoulder blade. In the top position, the shoulder blades should glide forward (protraction); in the bottom position, they should come together toward the spine (retraction). Anyone who permanently shrugs their shoulders or "pinches" them together blocks this movement. The muscle in charge of this control is the serratus anterior — the article Which Muscles Do Push-Ups Train? explains its role in detail.
- Muscular imbalance. Anyone who only pushes and never pulls shortens the chest and weakens the backside. The shoulder drifts forward, the space narrows, and the problem grows.
- Too deep, too soon. Push-ups on handles with extreme depth are a powerful stimulus — but only for shoulders that can control that range. Anyone new to it should only go as deep as they can without the shoulder drifting forward.
What helps
- Arrow, not T. Imagine squeezing an orange in your armpit. Hands shoulder-width apart, elbows pointing diagonally back. Film yourself from above once.
- Scapular push-ups. In a plank, arms straight, only pull your shoulder blades together and push them apart again. 2 × 15 before every session teaches shoulder-blade control better than any explanation.
- One pull per push. For every set of push-ups, one set of rows, pull-ups, band pulls, or face pulls. This isn't a recommendation — it's shoulder insurance.
- Strengthen external rotation. Band external rotations, 2–3 × 15 per side, twice a week. Your rotator cuff will thank you.
- Increase range gradually. Start shallow, then go deeper — over weeks, not days.
The elbow: tendons need time
Elbow pain from push-ups is almost always a tendon issue: either the triceps tendon at the tip of the elbow (pain when locking out) or the tendon attachments at the bony bumps on the inside and outside — "tennis elbow" and "golfer's elbow," which also affect trainees who've never held a racquet. Tendons have poorer blood supply than muscles and adapt over weeks to months, not days. That's exactly the issue: the muscle has long been ready for diamond push-ups, but the tendon isn't yet.
- Don't lock out hard. Don't let the elbows "snap" into hyperextension with momentum at the top. Stop just short of full extension.
- Dose narrow variants. Diamond push-ups load the triceps tendon and the inside of the elbow the most. Start with one set per session, not four.
- Slow eccentrics. For early tendon issues, slow, controlled negatives (3–4 seconds) with reduced load are the treatment of choice — tendons prefer steady, moderate loading.
- Don't forget the forearms. The tendon attachments at the elbow belong to the forearm muscles. Anything that strengthens the wrist helps here too.
The lower back: a bracing problem
Lower-back pain during push-ups is practically always caused by a sagging hip. As the core tires, the pelvis tips forward, the lumbar spine arches into hyperextension, and the facet joints carry load that the abdominal muscles should be holding instead. The fix isn't in the back, it's in core bracing: engage the glutes, tighten the abs, tuck the pelvis slightly under — the bracing principle explained step by step in the article How to Breathe Properly During Push-Ups. If you lose tension mid-set, end the set. A push-up with a sagging lower back doesn't count.
The pain traffic-light
Not every pull is a warning sign, and not every pain should be "trained through." This grading has proven useful in practice:
| Level | What you feel | What you do |
|---|---|---|
| Green | Muscle burn, next-day soreness, a slight pull that disappears after warming up | Keep training normally. This is adaptation. |
| Yellow | Joint pain up to 3 out of 10 during the exercise, gone within 24 hours, and not worsening week to week | Check your technique, switch to an easier variant (handles, incline), cut volume by 30–50%, add the prehab routine. Reassess after two weeks. |
| Red | Sharp pain above 3 out of 10, pain at rest or at night, numbness, tingling, swelling, loss of strength, pain that persists or worsens over two weeks | Pause push-ups, get it checked by a doctor. Don't push through it. |
The 10-minute prehab routine
Before every push-up session — or as its own session on off days:
- Wrist circles — 20 in each direction, then fold your hands and circle with interlaced fingers.
- Wrist stretch on all fours — palms on the floor, fingers pointing forward, then outward, then backward; rock gently forward and back for 30 seconds each.
- Back-of-hand support — backs of the hands on the floor, fingers pointing toward your knees, slowly shift your weight. 30 seconds.
- Scapular push-ups — 2 × 15, arms straight, only the shoulder blades move.
- Band external rotation — 2 × 15 per side, elbow at your side.
- Band pull-aparts — 2 × 20, pull the band apart at chest height.
- Two incline push-up warm-up sets — 2 × 10 with hands elevated, focusing deliberately on the arrow shape and shoulder-blade control.
Getting back into training
After a break due to discomfort, the rule is: the progression restarts wherever the pain was. Start with a variant at least two stages easier than the one that hurt — incline instead of standard, handles instead of a flat hand — and increase volume and load by no more than 10 percent per week. Alongside your reps, log a pain scale of 0 to 10 for every session: a three-week trend tells you more than any single session. And if you're planning your build-up anyway, you'll find more on managing load in Push-Ups Over 40, tips that apply regardless of age.
Conclusion
Wrist, shoulder, elbow, back — every one of these pains has a mechanism, and every mechanism has a fix: a neutral wrist, an arrow instead of a T, controlled shoulder blades, balanced pulling, a braced core, and volume that gives tendons time. Anyone who internalizes these principles early can train push-ups for decades — without a single joint ever becoming an issue.